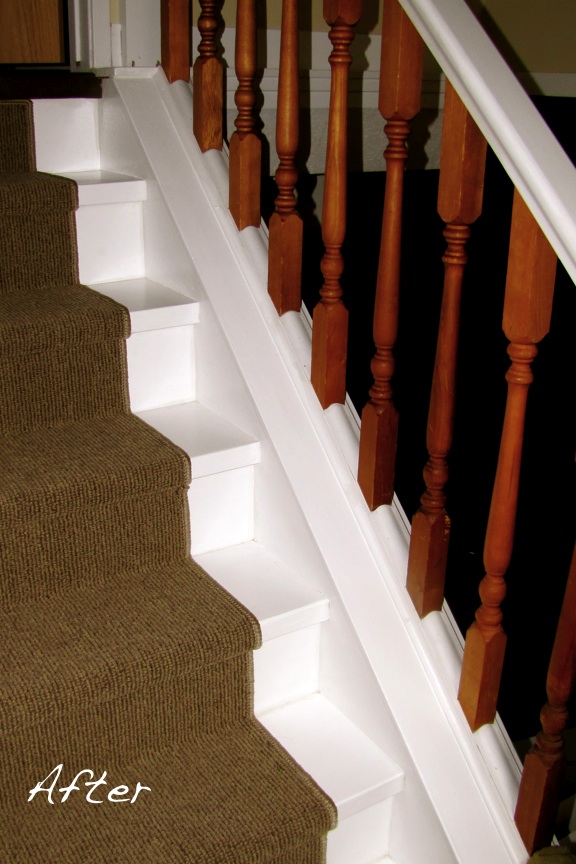
DIY: Installing an Inexpensive Carpet Stair Runner
This is the final installment for our big stair revamp. You can view phase one here, which is a DIY guide to painting your stairs! I must say that I am so thankful for my husband Matt who is always willing to tackle these projects with me! He really is my perfect match 😉 All start you off with the dramatic transformation, and then you can see how easy it is!
Alright, enough of the mush! So, this is a rather simple project, and the cost depends on what you purchase for your runner. I actually used 3 packs of area rugs (2 in each package) from Superstore (of all places!) They were $12/pack. I was one foot short with purchasing 2 packs, so while it was a bummer that I had to get a 3rd pack, the total came to $36- which really is not bad! I entertained going with a cute aqua or red, however, because we are planning on moving, decided to go with some less loud and more complimentary to our tiles. I think it was a good choice.
For this project you will need:
Area rugs to run the length of your stairs (we had 11 stairs and our rugs came to $36.)
Staples/Air Compressor Gun (I had both of these these- $0)
Grip Mat (optional) (also had this left over from a package I bought to put pieces under our area rugs, not sure on the cost! sorry- $0)
Now when I had this crazy idea, I googled it… because I wanted to see if anyone had done it before, and I found a DIY at Loft&Cottage I am not too familiar with this blog, but wanted to mention it, as it got my wheels turning, and helped to give me the confidence for this project. I did mine a little bit differently, and my project was much cheaper. I chose not to use adhesive, and instead used a grippy mat for use under area rugs on hardwood etc… after all the scraping and scrubbing of the lino glue, there was no way I could bring myself to cover my freshly painted stairs in adhesive!
Matt and I tagged team the stairs going up, and then I did the stairs to the basement all on my lonesome! Yeah for power tools 😉
So, let’s get started! (lots of exclamation marks because I am so excited about how easy this is, and how great the end result looks…) A few tips before you get scrolling: 1)Remember to measure on either side of your rug and get it centred.
2) Pull the rug VERY tight, so that it does not bubble
3) I kept the air nailer at about 80PSI, and this seemed like a good pressure
4)You don’t have to be too precise when cutting the grip mat (as you can see) just make sure it does not show!
5)Be sure to trim a straight line if you need to transition to a new rug, or else your runner might start to go crooked!
6) That is all…
And that is all it takes to install a carpet runner! I think the key to this is using the right tool, and it ends up being very fast… probably took 20-30 minutes per section of stairs… but mostly because we were interrupted 😉 I would definitely do this again! The great thing is, that if you tire of it… it didn’t cost to much, and it is only stapled (however very secure) so you could always switch it out in a few years if you so desire! If you try this, I’d love to see a picture of your end result!
investigating the "new"stairs 🙂 I think I added the edge staples after this... quality control!
[…] of space, still functioned- albeit poorly. And, we just live with things some times, like my hideous lino stairs that always made me feel dirty. And also because, I don’t think everything needs to be new. […]
Cool…a few years since you posted but this is just what I have been thinking of doing with some nice striped rugs we have, and it is nice to see the problems solved before I start 🙂
Although still toying, on and off, with just painting them…
I suppose it would depend on whether or not your stair treads are open, or have a riser. If they were open you could simple wrap and staple individual carpet pieces, otherwise there would be a lot of “pizza” style trimming and stapling in order to get the carpet to lay properly. Good luck!
Ashlea, I know you’ve moved your site over to MamasDance.com but I found this to be extremely useful and pocketbook friendly! The pictures of your staple placement were the best part because I had no idea how many staples to use, and definitely didn’t want the rugs to tear out. Great job! – Caryn
Love this idea! We live in Minnesota and I’m wondering what Superstore you found the rugs at? Kim
Hi Kim! Sorry for the delayed reply- I’ve moved to MamasDance.com, so I will get to your Q’s much quicker there! I am in Canada, and we have a store called “Superstore” It is probably similar to Target or Wal-Mart in the US.
This is probably a stupid question, but where did you get the runners?
Hi Aubrey-
Sorry for the delay! I’ve moved to Mamasdance.com – so I will get your Q’s much quicker there. I bought the the runners from “Super Store” In Canada, but you could find something similar in a Department or Hardware store, in the seasonal section.
Hi BJ,
I started on the kick plate, or riser (so at the very top of the riser) and then went down onto the tread, on to the next riser etc. Hope that helps!


you did a SUPER job! I love it. Very nice,
[…] of space, still functioned- albeit poorly. And, we just live with things some times, like my hideous lino stairs that always made me feel dirty. And also because, I don’t think everything needs to be new. […]
Cool…a few years since you posted but this is just what I have been thinking of doing with some nice striped rugs we have, and it is nice to see the problems solved before I start 🙂
Although still toying, on and off, with just painting them…
Hi, thanks for all the great tips and inspiration . I took all your advice and put the exact same runner on my stars. It looks great!
I would love to seen a picture but I thinks that’s harder then doing the stair runner!!
Glad to hear! 🙂
I just put in spiral stairs. I love the look of stair runners, but I’m not sure if I can manage that look with a spiral case. Any suggestions?
I suppose it would depend on whether or not your stair treads are open, or have a riser. If they were open you could simple wrap and staple individual carpet pieces, otherwise there would be a lot of “pizza” style trimming and stapling in order to get the carpet to lay properly. Good luck!
Ashlea, I know you’ve moved your site over to MamasDance.com but I found this to be extremely useful and pocketbook friendly! The pictures of your staple placement were the best part because I had no idea how many staples to use, and definitely didn’t want the rugs to tear out. Great job! – Caryn
Thanks Caryn, glad to hear it was helpful!
Love this idea! We live in Minnesota and I’m wondering what Superstore you found the rugs at? Kim
Hi Kim! Sorry for the delayed reply- I’ve moved to MamasDance.com, so I will get to your Q’s much quicker there! I am in Canada, and we have a store called “Superstore” It is probably similar to Target or Wal-Mart in the US.
This is probably a stupid question, but where did you get the runners?
Hi Aubrey-
Sorry for the delay! I’ve moved to Mamasdance.com – so I will get your Q’s much quicker there. I bought the the runners from “Super Store” In Canada, but you could find something similar in a Department or Hardware store, in the seasonal section.
where do you start on the top? on the landing or on the first stair?
Hi BJ,
I started on the kick plate, or riser (so at the very top of the riser) and then went down onto the tread, on to the next riser etc. Hope that helps!
What size of staples did you use? can you please email me the size?